公開日時:2022.08.06
最終更新日:2022/08/06
footer直前で止まるボタンを実装!
こんにちは!
ストレス発散でドラムを叩きまくったGlobal Web Designの福田です(笑)
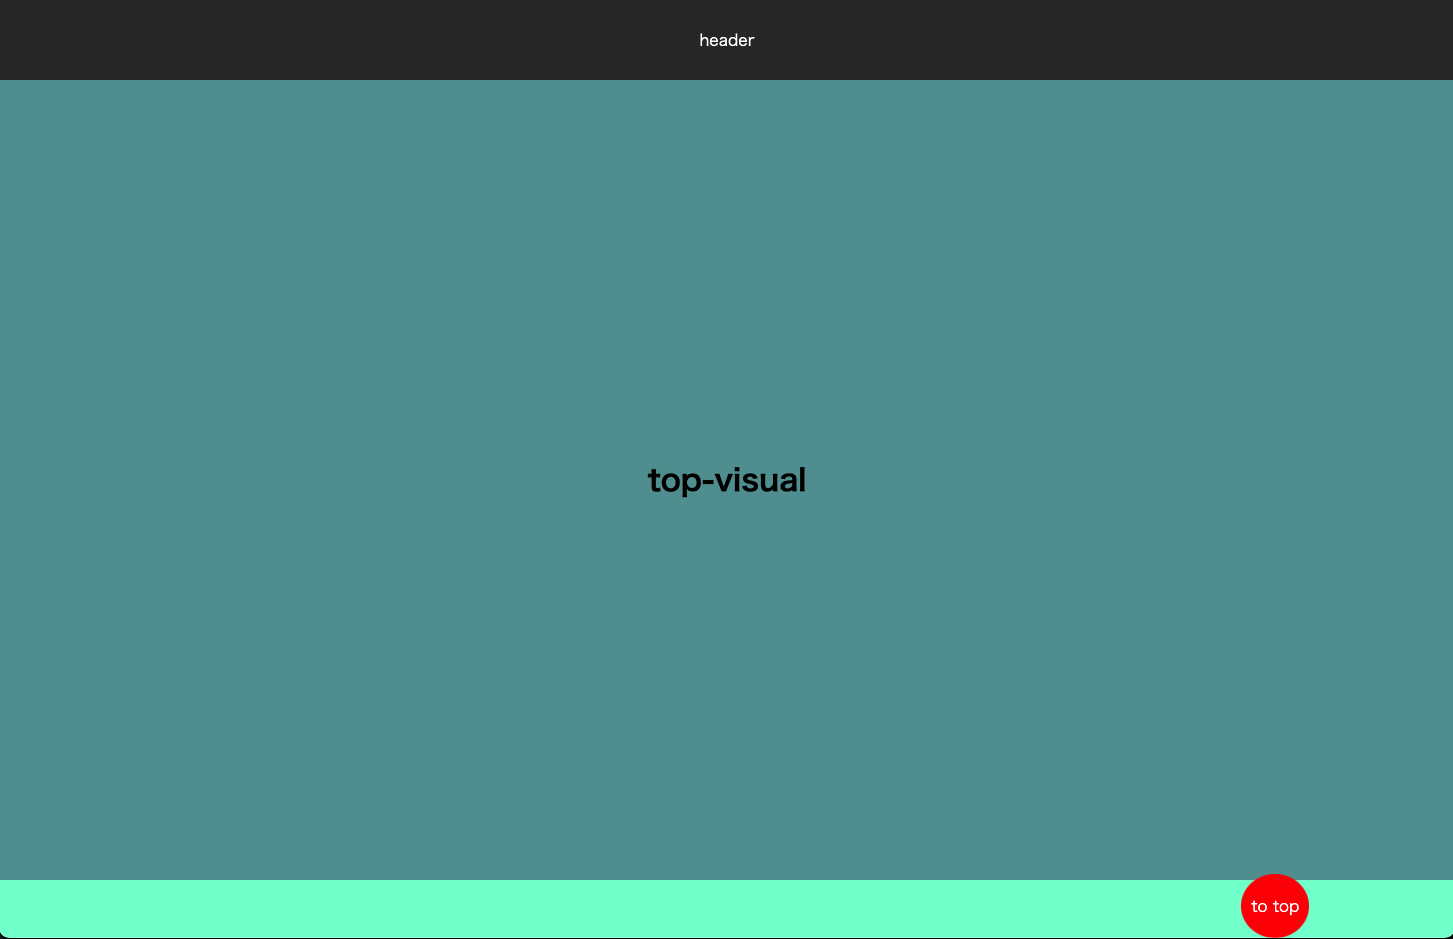
Webサイトでトップに戻るボタンなどを右下に設置することが多いと思います!
設置したときにトップに戻るボタンがfooter内に入ってしまったり、トップのメインのビジュアルに被ってしまうことがあると思います。
そこで今回は設置したボタンをトップのメインのビジュアルで消して、footerの前で停止する機能をJavaScriptで実装していきます!
目次
HTML、CSSでボタンを設置
まず、HTML・CSSでボタンなどを実装していきます。
<body>
  <header id="top">
    <p>header</p>
  </header>
  <main>
    <div class="top-visual">
      <h1>top-visual</h1>
    </div>
    <div class="sec"></div>
  </main>
  <a class="btn" href="#top">to top</a>
  <footer>
    <p>footer</p>
  </footer>
</body>
*{
margin: 0;
}
body{
position: relative;
}
header{
width: 100%;
height: 80px;
background-color: #333;
}
header p{
line-height: 80px;
text-align: center;
color: #fff;
}
.top-visual{
width: 100%;
height: 800px;
background-color: cadetblue;
position: relative;
}
.top-visual h1{
font-size: 30px;
position: absolute;
top: 50%;
left: 50%;
transform: translate(-50%, -50%);
}
.sec{
background-color: aquamarine;
height: 600px;
}
.btn{
position: fixed;
bottom: 0;
right: 10%;
text-decoration: none;
background-color: red;
color: #fff;
padding: 20px 10px;
border-radius: 50%;
}
footer{
height: 200px;
background-color: blue;
}
footer p{
line-height: 200px;
text-align: center;
color: #fff;
}ブラウザで見ると
これでボタンを右下に設置しました。
「position: fixed;」「bottom: 0;」「right: 10%;」でボタンを右下に配置しています。
現段階ではfooterの下に配置されてしまいます。
トップビジュアルと重なると、ボタンを非表示にする
ここから、JavaScriptでトップビジュアルと重なると、ボタンを非表示に機能を実装していきます。
//スクロールした時に処理を実行
window.addEventListener('scroll', function(){
  //トップへ戻るボタンを取得
  let topBtn = document.querySelector('.btn');

  //スクロール位置
  const scrollPosition = window.pageYOffset;

  //画面上部からトップビジュアル下の位置取得
  const topVisual = document.querySelector('.top-visual').getBoundingClientRect().bottom;

  //トップビジュアル下の位置より下にスクロールされたらactiveクラウを付与
  if(topVisual <= 0){
    topBtn.classList.add('active');
  } else {
    //スクロールが200px未満のときactiveクラスを外す
    topBtn.classList.remove('active');
  }
});
「window.addEventListener(‘scroll’, function(){});」でスクロールした時の処理を実行させます。
「let topBtn = document.querySelector(‘.btn’);」でトップへ戻るボタンを取得。
「wdocument.querySelector(‘.top-visual’).getBoundingClientRect().bottom;」 で画面上部からトップビジュアル下の位置を取得しています。
条件分岐を使って、トップビジュアルが完全に見えなくなったら、トップへ戻るボタンにactiveクラスの取り外しをします。
そして、activeクラスがついた時のCSSを追記します。
*{
  margin: 0;
}
body{
  position: relative;
}
header{
  width: 100%;
  height: 80px;
  background-color: #333;
}
header p{
  line-height: 80px;
  text-align: center;
  color: #fff;
}
.top-visual{
  width: 100%;
  height: 800px;
  background-color: cadetblue;
  position: relative;
}
.top-visual h1{
  font-size: 30px;
  position: absolute;
  top: 50%;
  left: 50%;
  transform: translate(-50%, -50%);
}
.sec{
  background-color: aquamarine;
  height: 600px;
}
.btn{
  position: fixed;
  bottom: 0;
  right: 10%;
  text-decoration: none;
  background-color: red;
  color: #fff;
  padding: 20px 10px;
  border-radius: 50%;
  /* 追記 */
  opacity: 0;
  transition: opacity .5s;
}
/* 追記 */
.btn.active{
  opacity: 1;
}
footer{
  height: 200px;
  background-color: blue;
}
footer p{
  line-height: 200px;
  text-align: center;
  color: #fff;
}
これでブラウザを見てみると、
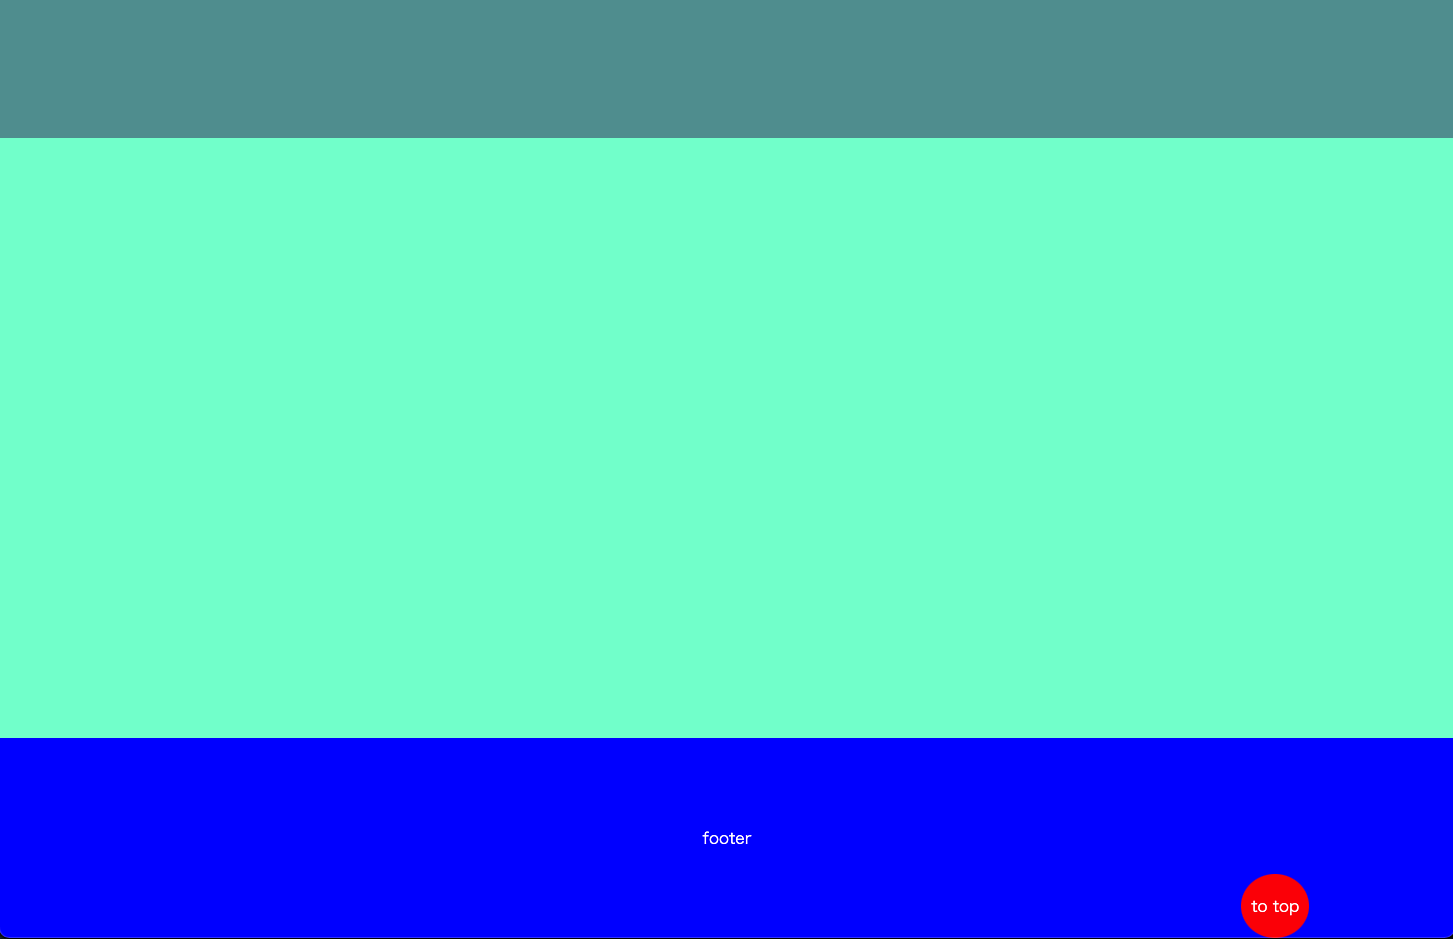
トップビジュアルに近づいたらボタンを非表示にできました。
ボタンの非表示は「opacity: 0;」で非表示に、「transition: opacity .5s;」で「opacity」の変化の時間を0.5秒に、「.btn.active{opacity: 1;}」でactiveクラスがついたときに表示するようにしています。
footerに近づいたらボタンを止める機能を実装
次に、footerに近づいたらボタンを止める機能を実装していきます。
//スクロールした時に処理を実行
window.addEventListener('scroll', function(){
  //トップへ戻るボタンを取得
  let topBtn = document.querySelector('.btn');

  //画面上部からトップビジュアル下の位置取得
  const topVisual = document.querySelector('.top-visual').getBoundingClientRect().bottom;

   //トップビジュアル下の位置より下にスクロールされたらactiveクラウを付与
  if(topVisual <= 0){
    topBtn.classList.add('active');
  } else {
    //スクロールが200px未満のときactiveクラスを外す
    topBtn.classList.remove('active');
  }
  // 追記
  //ドキュメントの高さ
  const scrollHeight = document.body.clientHeight;

 //スクロール位置
  const scrollPosition = window.pageYOffset;

  //windowの高さ
  const windowHeignt = window.innerHeight;

  //footer取得
  const footer = document.querySelector('footer');

  //footerの高さ
  const footerHeight = footer.offsetHeight;
  if(scrollHeight - scrollPosition - windowHeignt <= footerHeight){
    topBtn.classList.add('stop');
  } else {
    topBtn.classList.remove('stop');
  }
});
まずドキュメントの高さを「document.body.clientHeight;」で取得しています。
次に見ているウインドウの高さを「window.innerHeight;」で取得。
footerを「document.querySelector(‘footer’);」で取得したあと、「footer.offsetHeight;」でページ上部からfooter上部までの位置を取得します。
条件分岐を使って「scrollHeight – scrollPosition – windowHeignt <= footerHeight」でfooter上部までスクロールした位置を計算しています。
「ドキュメントの高さ – スクロール位置 – ウインドウの高さ <=(以下) ページ上部からfooter上部までの高さ 」という計算になります。
footerの上部まで来たときにstopクラスを付与、そうでないときにstopクラスを外します。
あとはCSSでボタンにstopクラスがついた時にfooter上部に止めてあげます。
*{
  margin: 0;
}
body{
  position: relative;
}
header{
  width: 100%;
  height: 80px;
  background-color: #333;
}
header p{
  line-height: 80px;
  text-align: center;
  color: #fff;
}
.top-visual{
  width: 100%;
  height: 800px;
  background-color: cadetblue;
  position: relative;
}
.top-visual h1{
  font-size: 30px;
  position: absolute;
  top: 50%;
  left: 50%;
  transform: translate(-50%, -50%);
}
.sec{
  background-color: aquamarine;
  height: 600px;
}
.btn{
  position: fixed;
  bottom: 0;
  right: 10%;
  text-decoration: none;
  background-color: red;
  color: #fff;
  padding: 20px 10px;
  border-radius: 50%;
  opacity: 0;
  transition: opacity .5s;
}
.btn.active{
  opacity: 1;
}
/* 追記 */
.btn.stop{
  position: absolute;
  bottom: 200px;
}
footer{
  height: 200px;
  background-color: blue;
}
footer p{
  line-height: 200px;
  text-align: center;
  color: #fff;
}
完成はこちら!
See the Pen 止まるボタン by Fukuda Yuzuru (@fukuda-yuzuru) on CodePen.
jQueryはこちら
$(document).ready(function () {
  $(window).on("scroll", function () {
    var topBtn = $('.btn');

    var topSec = $('.sec');

    //スクロールポジション
    var scrollPosition =  $(window).scrollTop();

    //トップビジュアルの下の要素の上部を取得
    var topVisualBottom = topSec.offset().top;
    if(topVisualBottom < scrollPosition){
      topBtn.addClass('active');
    } else {
      topBtn.removeClass('active')
    }

    //ドキュメントの高さ
    var scrollHeight = $(document).height();
    //windowの高さ
    var windowHeight = $(window).height();

    //footerの高さ
    footHeight = $("footer").innerHeight();
    console.log(scrollPosition);
    if (scrollHeight - windowHeight - scrollPosition <= footHeight) {
      topBtn.addClass('stop');
    } else {
      topBtn.removeClass('stop');
    }
  });
});
まとめ
いかがでしたでしょうか?
今回は設置したボタンをトップのメインのビジュアルで消して、footerの前で停止する機能をJavaScriptで実装しました!
私はjQueryは使ってないので、jQueryを書くときに
「どうやるんやっけ?」
となってしまいます(笑)
JavaScriptでスクロール量や位置などを確認するときは「console.log()」を使うとわかるので、「console.log()」を使いながら実装していくと良いですよ!